Let's Encrypt

certbot 申请通配符证书

  1. 安装 cerbot

    1
    2
    3
    4
    apt install cerbot

    查看可用命令
    certbot --help all
  2. 申请证书

    1
    2
    3
    4
    5
    6
    7
    8
    9
    certbot certonly -d *.hmlxy.cn --manual --config-dir config --work-dir work --logs-dir logs --preferred-challenges dns -m xx@xx.com --agree-tos --eff-email

    certonly 只获取或更新证书
    --manual 以交互方式获取证书
    -d 要为其获取证书的域的用逗号分隔的列表(通配符直接使用*.xxx.xx)
    --preferred-challenges 用于指定在验证域名所有权时使用的方法Eg, "dns" or "http,dns"
    -m 重要帐户通知的电子邮件地址
    --agree-tos 同意 ACME 服务器的订阅者协议
    --eff-email 要与 EFF 共享你的电子邮件地址

    上面就是让你验证域名是属于你的,将上述值添加到 DNS 解析中,如下图:

    然后回车看到下面内容就成功了。

  3. 安装证书
    随便安装在一个 web 服务上,如我的博客 nginx 配置:

    然后能使用 https 访问就成功啦!!!

前端一些

关于前端一些文档

算法

知识点

master 公式

T(N) = a*T($\frac{N}{b}$) + O($N^d$) 用来计算一些复杂算法的时间复杂度 如:递归

a:生成的子问题数(比如二叉树的递归遍历就是 a = 2)
b:表示每次递归是母问题的 1/b 的数据规模
N:母问题的数据规模
d:额外操作的次数
注:使用 Master 公式分析递归问题时间复杂度时,各子问题的数据规模应该是一致的,否则不能使用 Master 公式。

使用递归查找出一个数组中的最大值:

1
2
3
4
5
6
7
8
9
10
11
12
13
14
15
16
17
func RecursionGetMax(arr []int, l, r int) int {
if l == r {
return arr[l]
}
mid := l + (r-l)>>1
lmax := RecursionGetMax(arr, l, mid)
rmax := RecursionGetMax(arr, mid+1, r)
if lmax > rmax {
return lmax
}
return rmax
}

func main(){
arr :=[]int{1,2,3,4,5}
RecursionGetMax(arr,0,len(arr)-1)
}

上面这段代码就是用递归加二分法去将每项值返回然后再比大小,此时、母问题就是最开始掉用的函数 RecursionGetMax(arr,0,len(arr)-1) 此时数据量有 n 个,数据量是母数据的一半 所以 b = 2 。子问题是 RecursionGetMax(arr, l, mid) 和 RecursionGetMax(arr, mid+1, r) 分别查找左右两边的最大值 所以 a = 2 有两个子问题 ,每个子问题的数据量是母问题的一半所以 b = 2 。除此之外的时间复杂度为 O(1) 。 所以最后套用 master 公式:T(N) =2*T($\frac{N}{2}$)+ O(1)

满足 master 公式的算法的时间复杂度计算:

$log_ba$ > d 时间复杂度: O($N^{log_ba}$)
$log_ba$ < d 时间复杂度: O($N^{d}$)
$log_ba$ == d 时间复杂度: O($N^d * logN$)

上面的算法 a=2 ,b=2 所以满足第二条 此算法的时间复杂度为 O(N)

堆(Heap)

堆(Heap)是一种特殊的树状数据结构,通常用于实现优先队列和堆排序等算法。堆分为两种主要类型:最大堆和最小堆。

  • 最大堆(Max Heap):

    在最大堆中,对于任意节点 i,父节点的值大于或等于其子节点的值。
    最大堆的根节点包含的元素是堆中的最大元素。

  • 最小堆(Min Heap):

    在最小堆中,对于任意节点 i,父节点的值小于或等于其子节点的值。
    最小堆的根节点包含的元素是堆中的最小元素。

堆通常是一个二叉树,可以通过数组来表示。在这种表示方法中,堆中的每个节点 i 对应数组的索引 i。假设节点 i 的索引为 i,则:

左子节点索引: 2i+1
右子节点索引: 2i + 2
父节点索引: $\displaystyle\frac{i-1}2$

插入:
heapsize++ 并且将该值与父节点 $\displaystyle\frac{i-1}2$ 上的值进行比较,组成你需要的最大堆或者最小堆

删除根节点:
将最末尾的数移至根节点,heapsize– 然后从该下标出分别与左右子节点相比较,组成你需要的最大堆或者最小堆

修改:
如果是最大堆,修改后的值变大了,就与父节点比较,如果变小了就与左右子节点比较。

堆排序:

利用最大堆或最小堆根节点最大值最小值的特性,将依次把根节点删除(上面有介绍),在把堆中数据全部删除过了一遍之后就形成了一个有序的数组。要想形成生序数组就需要最大堆,反之最小堆。

linux smb 服务开启实现文件共享

linux smb 服务开启实现文件共享

如何实现不同系统间的文件共享操作

想要实现文件共享有很多种方式 比如 NFS,FTP,SMB,云存储,NAS 等,今天我们 SMB 协议来搭建一个跨平台的文件共享。

SMB 介绍

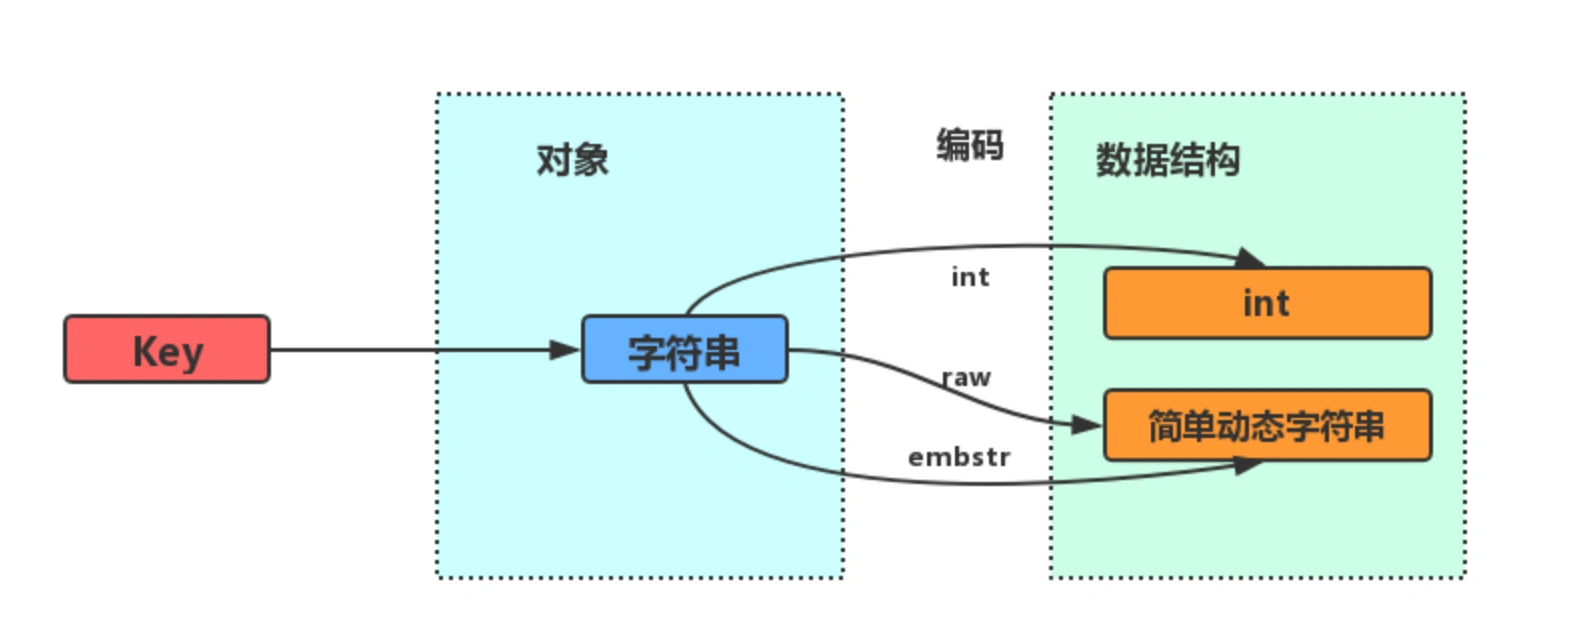
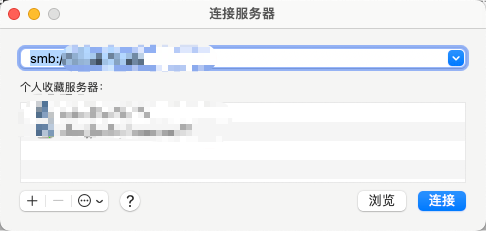
服务器消息块(Server Message Block,缩写为 SMB),又称网络文件共享系统(Common Internet File System,缩写为 CIFS, /ˈsɪfs/),一种应用层网络传输协议,由微软开发,主要功能是使网络上的机器能够共享计算机文件、打印机、串行端口和通讯等资源。它也提供经认证的进程间通信机能。它主要用在装有 Microsoft Windows 的机器上,在这样的机器上被称为 Microsoft Windows Network。

经过 Unix 服务器厂商重新开发后,它可以用于连接 Unix 服务器和 Windows 客户机,执行打印和文件共享等任务。
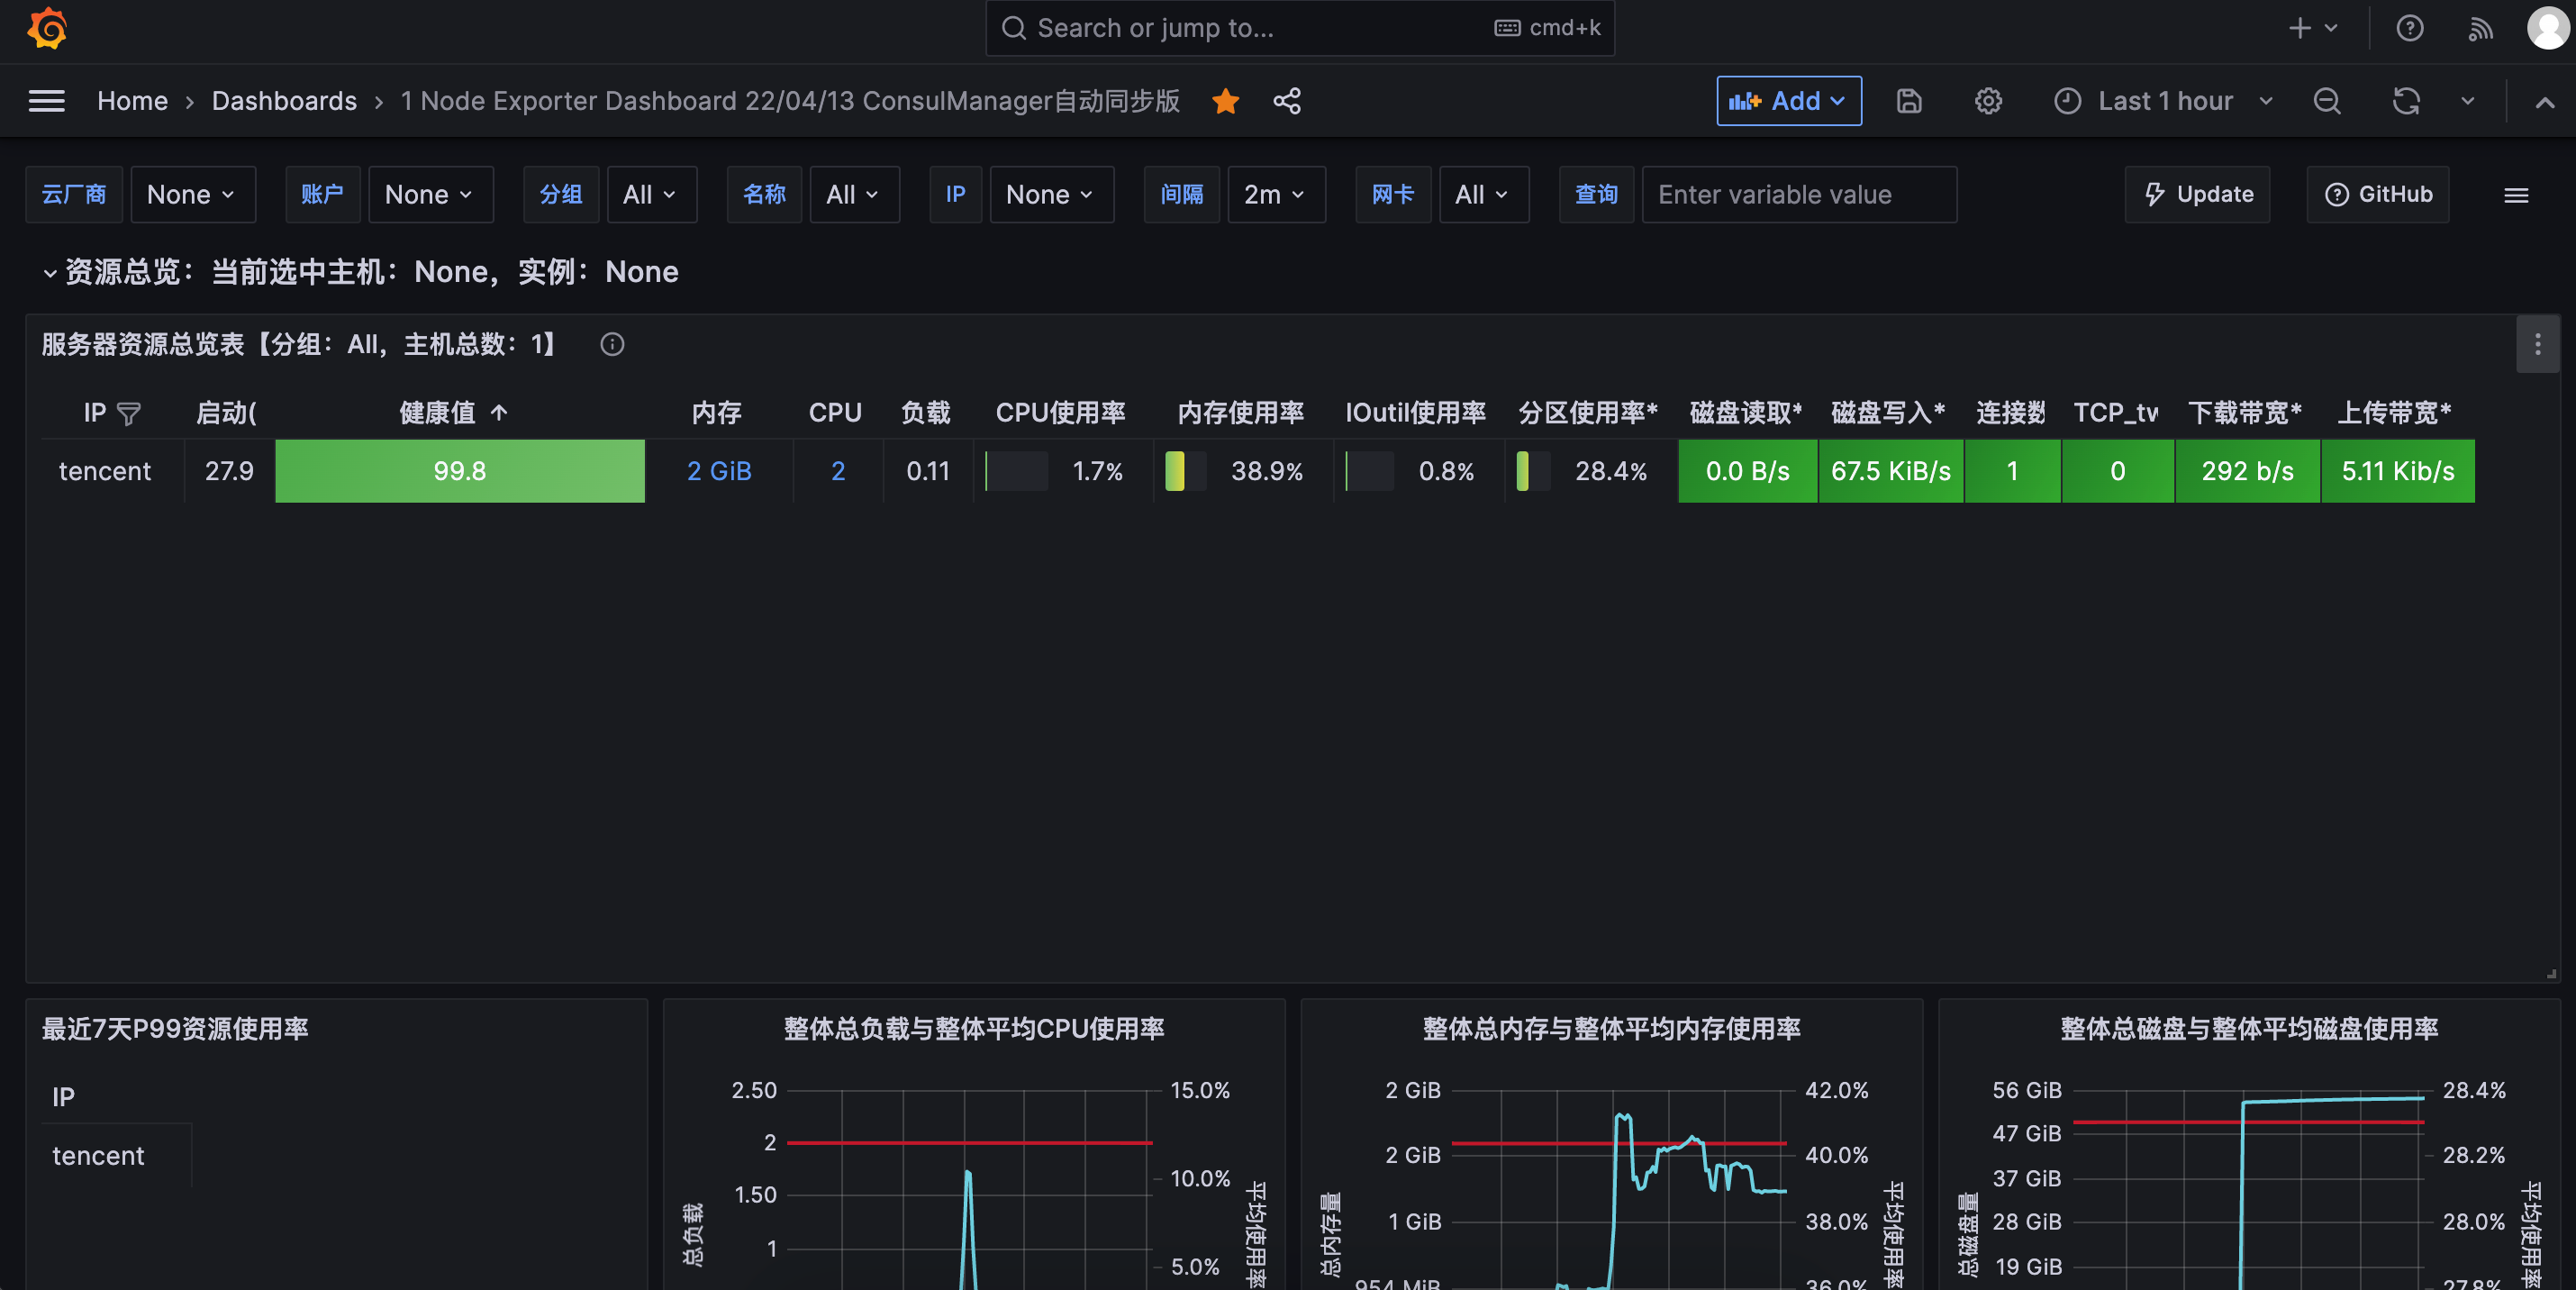
与功能类似的网络文件系统(NFS)相比,NFS 的消息格式是固定长度,而 CIFS 的消息格式大多数是可变长度,这增加了协议的复杂性。CIFS 消息一般使用 NetBIOS 或 TCP 协议发送,分别使用不同的端口 139 或 445,目前倾向于使用 445 端口。CIFS 的消息包括一个信头(32 字节)和消息体(1 个或多个,可变长)。

搭建 SMB 服务

  1. 安装 samba

    1
    2
    apt update
    apt install samba
  2. 创建用户登入的用户

    • 现在 linux 系统中添加用户名
      1
      sudo useradd <用户名>
    • 添加 smb 用户名密码
      1
      sudo smbpasswd -a <用户名>
      然后在输入密码 这个账号用于登入这个 smb 服务
  3. 编辑配置文件

    1
    vim /etc/samba/smb.conf

    smb 的默认配置文件就是这个路径然后我们将需要共享出去的文件夹配置上去 这个文件夹的权限得改一下

    1
    sudo ch
    1
    2
    3
    4
    5
    [共享名称]
    path = /共享的目录路径
    browseable = yes
    read only = no
    valid users = <用户名>
  4. 启动 smb 服务

    1
    2
    sudo systemctl start smbd
    sudo systemctl status smbd
  5. 开启防火墙
    需要将防火墙的 139 和 445 两个端口打开,我这里用的是云主机所以直接去控制台设置一下就行

  6. 连接
    可以用 windows 的映射网络驱动器 来连接就好或者你也可以下载个 smb client 工具去连接
    linux smbclient //共享服务器 IP 地址/共享名称 -U 用户名

    windows //共享服务器 IP 地址/共享名称

    mac smb://共享服务器 IP 地址/共享名称

protoc 插件如何写?

protoc 插件如何写?

如何编写一个 protoc 的插件

我们在编写 protocol 文件去生成.pb.go 文件的时候你都知道它是如何做到的吗?
整个过程很简单,其实我们之前生成的 go 文件是用的 protoc-gen-go 插件,可以去 github 上看看这个插件的代码 https://github.com/protocolbuffers/protobuf-go/blob/master/cmd/protoc-gen-go/main.go 里面主要用到的库是 google.golang.org/protobuf/compiler/protogen

其实插件的工作原理就是从标准输出读取和输入,具体可以看 https://protobuf.dev/reference/other/ 然后根据你的命令行中的 –{NAME}_out 去找 protoc-gen-{NAME} 这个插件然后生成文件具体请看官方文档
今天我们就一起来实现一个插件吧!

首先我们先来生成一个最基本的.pb.go 文件:

  1. 在生成之前我们都需要去下载一个二进制文件

    1
    go install google.golang.org/protobuf/cmd/protoc-gen-go@latest

    这个会存在你的$GOPATH/bin 目录下

  2. 编写一个简单的 proto

    1
    2
    3
    4
    5
    6
    7
    syntax = "proto3";
    package simple;
    option go_package = "./simple";

    message hello {
    string world = 1;
    }
  3. 生成 .pb.go 文件
    为了后续方便,就直接写一个 makefile

    1
    2
    gen:
    protoc --go_out=. --go_opt=paths=source_relative ./simple/simple.proto

    执行 make gen 就能输出 .pb.go 文件了

插件编写

  1. 代码

    1
    2
    3
    4
    5
    6
    7
    8
    9
    10
    11
    12
    13
    14
    15
    16
    17
    18
    19
    20
    21
    22
    23
    24
    25
    26
    27
    28
    29
    30
    31
    32
    33
    34
    35
    package main

    import (
    "flag"
    "fmt"
    "google.golang.org/protobuf/compiler/protogen"
    "os"
    )

    func main() {
    protogen.Options{
    ParamFunc: flag.CommandLine.Set,
    }.Run(func(gen *protogen.Plugin) error {
    for _, f := range gen.Files {
    if f.Generate {
    GenerateFile(gen, f)
    }
    }

    return nil
    })
    }

    func GenerateFile(gen *protogen.Plugin, f *protogen.File) {
    filename := f.GeneratedFilenamePrefix + "_plugin.pb.go"
    g := gen.NewGeneratedFile(filename, f.GoImportPath) // 初始化一个需要生成的文件
    g.P("// Code generated by protoc-gen-simple. DO NOT EDIT.")
    g.P("// source: ", f.Desc.Path())
    g.P()
    g.P("package ", f.GoPackageName) //包名
    for _, message := range f.Messages {
    _, _ = fmt.Fprint(os.Stderr, message) // 主要用来调试
    g.P("var _ = &", message.GoIdent, "{}") // 输出
    }
    }
    • gen.NewGeneratedFile 实例化一个生成文件的结构体

    • g.P(…) 写入文件操作

    • f.Messages 就是里面的 message 定义 还有 service 等等

    • _, _ = fmt.Fprint(os.Stderr, message)

      1
      至于这一段是为了调试,由于需要编译无法进行单步调试我就将需要获取的调试信息打印在了os.Stderr ,至于为啥不能是标准输出呢,是因为插件就是用标准输出来通信的,前面也有讲到过
  2. 编译

    1
    go install

    然后你就能看到你的$GOPATH/bin 目录下会有一个 protoc-gen-go-simple 二进制文件

  3. 使用插件
    在之前的命令加上一句 –go-simple_out=. –go-simple_opt=paths=source_relative

    1
    2
    3
    4
    5
    gen:
    protoc \
    --go_out=. --go_opt=paths=source_relative \
    --go-simple_out=. --go-simple_opt=paths=source_relative \
    ./simple/simple.proto

    make gen 你就能看到有两个.pb.go 文件了

以上的过程还是很简单的,就是调试起来很费劲也可能还有很简单的调试办法我不知道,还有一点就是文档不太友好,还得去看源码。基本上 proto 文件中所定义的里面的 *protogen.File 都能够拿到。所以可以干很多的骚操作,赶紧学起来吧~

helm 部署并配置

helm 部署并配置

helm 部署

之前都是编辑一大堆 yaml 文件来部署服务到 k8s,什么 dployment, service, ingress 这些都得写,太麻烦了所以现在改造一下用 helm来管理 k8s 的依赖管理

首先创建一个 chart

1
helm create xxx


简单解释下里面的文件夹都是啥

1
2
3
4
5
6
7
8
9
10
11
12
13
14
15
xxx
├─.helmignore
├─Chart.yaml # 创建的chart 一些信息
├─values.yaml # tempalet 里面需要的一些值
├─templates # 一些k8s中的模版 ingress,service,deployment 最主要用到的可能就这三个
| ├─NOTES.txt
| ├─_helpers.tpl
| ├─deployment.yaml
| ├─hpa.yaml
| ├─ingress.yaml
| ├─service.yaml
| ├─serviceaccount.yaml
| ├─tests
| | └test-connection.yaml
├─charts

那我们就留 deployment 和 service 两个模版由于我是用的是 k3s 里面的流量控制器不是 nginx 而是 traefik,所以我们用 crd 编辑一下,再把 deployment 里面不需要用到的删了,就跟配置 k8s 的 yaml 一样,如果不会的话最好看看 k8s 小编也不太精通还只是到会用的层面 QAQ ~
ingress

1
2
3
4
5
6
7
8
9
10
11
12
13
apiVersion: traefik.containo.us/v1alpha1
kind: IngressRoute
metadata:
name: my-ingress
spec:
entryPoints:
- web
routes:
- match: Host(`{{ .Values.ingress.host }}`) && PathPrefix(`{{ .Values.ingress.path }}`)
kind: Rule
services:
- name: { { include "deploy.fullname" . } }
port: { { .Values.service.port } }

deployment

1
2
3
4
5
6
7
8
9
10
11
12
13
14
15
16
17
18
19
20
21
22
23
24
25
26
27
28
29
30
31
32
apiVersion: apps/v1
kind: Deployment
metadata:
name: {{ include "blog.fullname" . }}
labels:
{{- include "blog.labels" . | nindent 4 }}
spec:
replicas: {{ .Values.replicaCount }}
selector:
matchLabels:
{{- include "blog.selectorLabels" . | nindent 6 }}
template:
metadata:
{{- with .Values.podAnnotations }}
annotations:
{{- toYaml . | nindent 8 }}
{{- end }}
labels:
{{- include "blog.selectorLabels" . | nindent 8 }}
spec:
{{- with .Values.imagePullSecrets }}
imagePullSecrets:
{{- toYaml . | nindent 8 }}
{{- end }}
containers:
- name: {{ .Chart.Name }}
image: "{{ .Values.image.repository }}:{{ .Values.image.tag | default .Chart.AppVersion }}"
imagePullPolicy: {{ .Values.image.pullPolicy }}
ports:
- name: http
containerPort: 80
protocol: TCP

service

1
2
3
4
5
6
7
8
9
10
11
12
13
apiVersion: v1
kind: Service
metadata:
name: { { include "deploy.fullname" . } }
labels: { { - include "deploy.labels" . | nindent 4 } }
spec:
type: { { .Values.service.type } }
ports:
- port: { { .Values.service.port } }
targetPort: http
protocol: TCP
name: http
selector: { { - include "deploy.selectorLabels" . | nindent 4 } }

.Values.xxx 就是在 values.yaml 中定义的一些常量,然后在使用 helm 部署上去

1
2
3
4
5
6
7
helm upgrade <chart实例名称> <chart路径> \
-n <k8s pod> \
--set 'image.repository=$(APP_IMAGE_NAME)' \
--set 'image.tag=$(APP_IMAGE_TAG)' \
--install

我这里是用了makefile 来执行,镜像名称和tag 都是自动生成的所以 chart中的 repository 和 tag 我都没写在这里替换一下,你们可以直接写死或者跟我一样


最后这样就成功啦!!整个 helm 部署的过程还是很简单的,就是里面有很多高级的配置项值得去研究一下,helm 总的来说就是方便了我们部署,并不需要写一大堆文件然后挨个 kubectl apply 上去,所以赶紧用起来吧~

ssh 免登入

ssh 免登入

SSH 免登入

ssh 官方文档

首先配置 ssh 的 config 将你的服务器取一个别名

1
vim .ssh/config

在写入你的主机配置

1
2
3
4
Host xxx
HostName <主机ip>
User root
Port xxx

然后再将你的密钥放到机器上去

1
ssh-copy-id xxx

输入完密码就好了

最后就 ssh xx 就进去啦

String

String

Redis 数据结构 ———— String

String 是最基本的 key-value 结构,key 是唯一标识,value 是具体的值,value 其实不仅是字符串, 也可以是数字(整数或浮点数),value 最多可以容纳的数据长度是 512M。

内部实现

SDS 和我们认识的 C 字符串不太一样,之所以没有使用 C 语言的字符串表示,因为 SDS 相比于 C 的原生字符串:

  • SDS 不仅可以保存文本数据,还可以保存二进制数据。因为 SDS 使用 len 属性的值而不是空字符来判断字符串是否结束,并且 SDS 的所有 API 都会以处理二进制的方式来处理 SDS 存放在 buf[] 数组里的数据。所以 SDS 不光能存放文本数据,而且能保存图片、音频、视频、压缩文件这样的二进制数据。
  • SDS 获取字符串长度的时间复杂度是 O(1)。因为 C 语言的字符串并不记录自身长度,所以获取长度的复杂度为 O(n);而 SDS 结构里用 len 属性记录了字符串长度,所以复杂度为 O(1)。
  • Redis 的 SDS API 是安全的,拼接字符串不会造成缓冲区溢出。因为 SDS 在拼接字符串之前会检查 SDS 空间是否满足要求,如果空间不够会自动扩容,所以不会导致缓冲区溢出的问题。

字符串对象的内部编码(encoding)有 3 种 :intrawembstr

如果一个字符串对象保存的是整数值,并且这个整数值可以用 long 类型来表示,那么字符串对象会将整数值保存在字符串对象结构的 ptr 属性里面(将 void*转换成 long),并将字符串对象的编码设置为 int。

如果字符串对象保存的是一个字符串,并且这个字符申的长度小于等于 32 字节(redis 2.+版本),那么字符串对象将使用一个简单动态字符串(SDS)来保存这个字符串,并将对象的编码设置为 embstr, embstr 编码是专门用于保存短字符串的一种优化编码方式:

K3s 搭建

K3s 搭建

K3s 搭建


K3s 和 K8s 相比较:

  • 大小和性能:K3s 相对于 K8s 来说更加轻量级,占用更少的资源,适用于资源有限的环境。K3s 在二进制文件大小、内存占用和启动时间方面都比 K8s 更加高效。

  • 安装和配置:K3s 的安装和配置相对来说更简单和快速,减少了一些复杂的步骤和依赖项。K8s 则需要更多的配置和管理,适用于大规模、复杂的生产环境。

  • 可扩展性:K8s 具有非常强大的扩展性,可以管理大型集群并处理数千个容器。K3s 在规模和功能方面相对较小,更适合中小规模的部署。

  • 功能和生态系统:K8s 提供了丰富的功能和广泛的生态系统,拥有大量的插件和工具来扩展和定制。K3s 为了精简而移除了一些不常用的功能和组件,因此在功能和生态系统方面相对较小。

安装

机器配置要求具体可以看 https://docs.k3s.io/zh/installation/requirements

1. 安装脚本

1
curl -sfL https://rancher-mirror.rancher.cn/k3s/k3s-install.sh | INSTALL_K3S_MIRROR=cn sh -s - --docker

k3s 默认使用的是 containerd 作为运行时容器

2. 检查操作系统是否满足需求

1
k3s check-config

3. 写一个 demo 服务

1
2
3
go mod tidy
vim main.go

1
2
3
4
5
6
7
8
9
10
11
12
13
14
15
16
17
18
package main

import (
"fmt"
"net/http"
)

func helloHandler(w http.ResponseWriter, r *http.Request) {
fmt.Fprint(w, "Hello")
}

func main() {
http.HandleFunc("/", helloHandler)
err := http.ListenAndServe(":8080", nil)
if err != nil {
fmt.Println("Error starting the server:", err)
}
}

这里使用 go 语言搭建一个基本 http 服务 访问 ip:8080 就能返回 Hello

Dockerfile

1
2
3
4
5
6
7
8
9
10
11
12
13
14
15
16
17
18
19
# 基于 golang 镜像构建
FROM golang:1.16-alpine AS build

# 设置工作目录
WORKDIR /app

# 复制源代码到容器中
COPY . .

# 构建可执行文件
RUN go init test
RUN go build -o app

# 生成最终镜像
FROM alpine:latest
COPY --from=build /app/app /app/app

# 设置容器启动命令
CMD ["/app/app"]

depolyment 部署文件

以下 depolyment 定义了一个 Deployment 和一个 NodePort 的 service

这里有个注意事项 ⚠️ 请看后面坑 3

1
2
3
4
5
6
7
8
9
10
11
12
13
14
15
16
17
18
19
20
21
22
23
24
25
26
27
28
29
30
31
32
33
34
apiVersion: apps/v1
kind: Deployment
metadata:
name: my-app
labels:
app: my-app
spec:
replicas: 1
selector:
matchLabels:
app: my-app
template:
metadata:
labels:
app: my-app
spec:
containers:
- name: my-app
image: my-app:latest
imagePullPolicy: IfNotPresent
ports:
- containerPort: 8080
---
apiVersion: v1
kind: Service
metadata:
name: my-app-srv
spec:
type: NodePort
selector:
app: my-app
ports:
- port: 30001
targetPort: 8080

Makefile

1
2
3
4
5
6
7
8
9
10
11
12
13
14
15
16
APP_NAME := app
DOCKER_IMAGE_NAME := my-app
DOCKER_IMAGE_TAG := latest
K8S_DEPLOYMENT_NAME := my-app
K8S_NAMESPACE := default

docker-build:
docker build -t $(DOCKER_IMAGE_NAME):$(DOCKER_IMAGE_TAG) .

k8s-deploy:
kubectl apply -f deployment.yaml -n $(K8S_NAMESPACE)

k8s-clean:
kubectl delete deployment $(K8S_DEPLOYMENT_NAME) -n $(K8S_NAMESPACE)

deploy: k8s-clean docker-build k8s-deploy

5. 配置 ingress

1
2
3
4
5
6
7
8
9
10
11
12
13
14
15
16
17
18
apiVersion: networking.k8s.io/v1
kind: Ingress
metadata:
name: my-ingress
annotations:
traefik.ingress.kubernetes.io/router.entrypoints: web
spec:
rules:
- host: www.hmlxy.cn
http:
paths:
- path: /
pathType: Prefix
backend:
service:
name: my-app-srv
port:
number: 30001

创建 ingress

1
kubectl apply -f ingress.yml

5. 服务启动

到这所有准备工作都做完了只需要按下「启动按钮

1
make deploy

查看服务 service

访问 www.hmlxy.cn

成功 啦!!!

总结

这次的 k3s 部署花了将近一天的时间,踩了许许多多的坑,但是最后都解决了,也让我学到了不少新的知识。

踩坑

坑 1:无法从/var/lib/rpm 打开软件包数据库


注:

RPM 是”Red Hat Package Manager”(红帽软件包管理器)的缩写。它是一种常见的软件包管理工具,最初由 Red Hat 开发,并在多个 Linux 发行版中使用。RPM 用于在 Linux 系统上管理和安装软件包。

RPM 软件包是一种打包格式,其中包含软件的二进制文件、配置文件、文档和其他相关资源。使用 RPM,用户可以方便地安装、升级、删除和查询软件包。通过使用 RPM,系统管理员可以轻松地管理大量的软件包,同时确保软件包之间的依赖关系得到满足。

在使用 RPM 时,您可以使用命令行工具(如 rpm 命令)执行各种操作,例如安装软件包、列出已安装的软件包、查询软件包信息、升级软件包等。此外,还可以使用其他工具,如 Yum(基于 RPM 的软件包管理器)和 DNF(Dandified Yum),它们提供了更高级的功能,如解决依赖关系、自动更新等。

需要注意的是,RPM 主要用于基于 Red Hat 和 CentOS 等发行版的 Linux 系统。其他 Linux 发行版(如 Debian 和 Ubuntu)使用的是不同的软件包管理工具,例如 Debian 中的 dpkg 和 apt-get,以及 Ubuntu 中的 dpkg 和 apt。

fix:重新构建 rpm 数据库

1
2
3
4
5
cd /var/lib/rpm

rm -rf __db.*

rpm --rebuilddb

坑 2:操作系统没有打开用户命名空间


fix:打开就好

1
vim /etc/default/grub

在 GRUB_CMDLINE_LINUX=”…”这行中添加 user_namespace.enable=1 参数,确保在其他参数之间添加一个空格。

更新 GRUB 配置

1
sudo grub2-mkconfig -o /boot/grub2/grub.cfg

重启电脑

坑 3:无法拉取镜像


可以看到我拉取镜像一直失败了,查看 k8s 文档

由于我一开始将 imagePullPolicy 字段省略了,并且通过我的 Makefile 文件可以看到我的镜像的 tag 是 latest 满足第一条,所以一直从远程拉取导致失败。只需要将 tag 改掉或者将 imagePullPolicy 设置为 IfNotPresent 或者 Never。建议改为 IfNotPresent

坑 4:无法访问程序


访问程序一直 404 curl 也是 404
一直以为是腾讯云域名解析错了的问题,思考了一下既然出了 404 那应该是路由没有匹配上,查看 ingress-controller

1
2
3
4
5
// 查看ingress-controller 控制器
kubectl get pods -n kube-system

// 查看控制器日志
kubectl logs -n kube-system traefik-56b8c5fb5c-7w7qd


果然报了一大堆错误 ❌ 看到「Cannot create service: service not found」这个日志我瞬间明白了,我一直以为 ingress 配置的 backend 是服务的名字,结果是 service 的名字 所以找不到 service 修改 ingress.yml 就好了

grafana+prometheus实现云主机监控

配置 Prometheus

1
2
3
4
5
mkdir prometheus

cd prometheus

vim prometheus.yml
  1. 编写 prometheus 配置文件
1
2
3
4
5
6
7
8
9
10
11
12
13
14
15
global:
scrape_interval: 15s # Set the scrape interval to every 15 seconds. Default is every 1 minute.
evaluation_interval: 15s # Evaluate rules every 15 seconds. The default is every 1 minute.
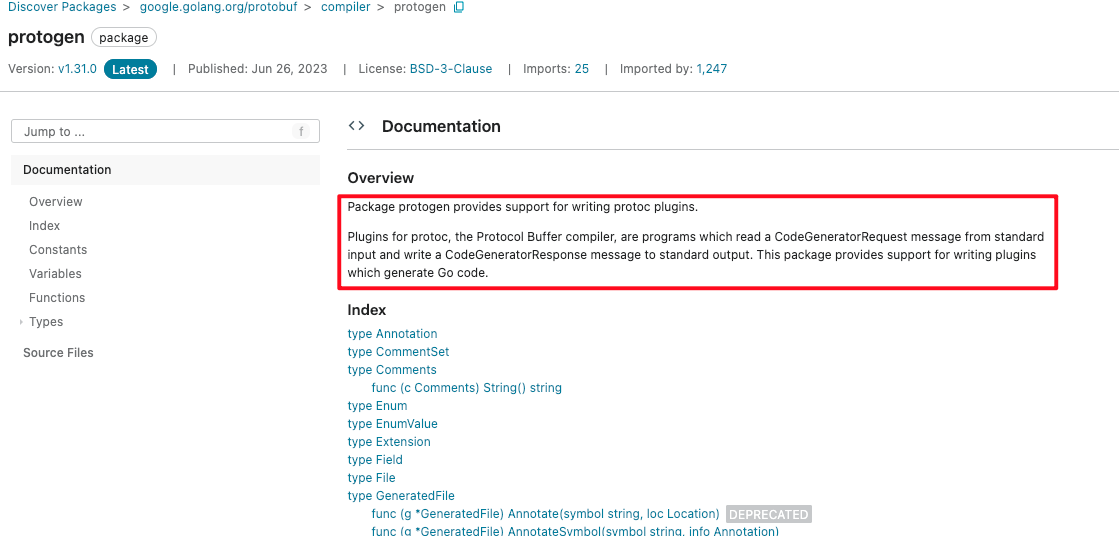
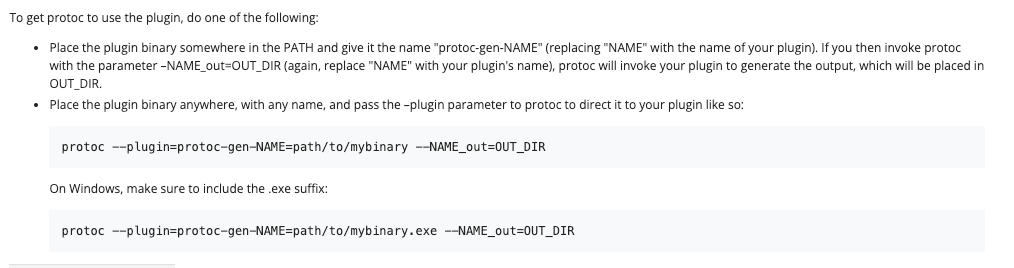
alerting:
alertmanagers:
- static_configs:
- targets:
scrape_configs:
- job_name: 'prometheus'
static_configs:
- targets: ['localhost:9090']
- job_name: 'node'
static_configs:
- targets: ['<你的ip>:9100']
  1. 启动 prometheus
1
docker run -p 9090:9090 -d --rm --name prometheus -v /root/app/prometheus/:/etc/prometheus/ prom/prometheus
配置 Node Exporter 采集服务器数据
  1. 启动 node exporter
1
2
docker run -d --name node-exporter -p 9100:9100 -v "/root/app/prometheus/proc:/host/proc:ro" -v "/root/app/prometheus/sys:/host/sys:ro" -v "/root/app/prometheus:/rootfs:ro" prom/node-exporter

  1. 查看 node exporter

浏览器打开 http://<你的服务器 ip>:9100/metrics

  1. 查看数据源

浏览器打开 http://<服务器 ip>:9090

点击后就能看到你配置的数据源了

配置 Grafana

  1. 启动 grafana
1
docker run --rm --name grafana -p 30001:3000 -d grafana/grafana
  1. 配置数据源

打开 http://<服务器 ip>:3001

配置数据源

勾选 prometheus

然后再将刚刚的 prometheus 网址输入进去然后点击 Save & test 然后在导入一个别人已经布置好的 dashboard https://grafana.com/grafana/dashboards/8919 输入编号 8919

然后就大功告成啦!

注:grafana 首次登入的账号密码是 admin 进去后会修改密码